Home
/ How To Build Garage Shelves : 20 diy garage shelving ideas.
How To Build Garage Shelves : 20 diy garage shelving ideas.
How To Build Garage Shelves : 20 diy garage shelving ideas.. You can build your own garage shelves from scrap 2 x 4s and plywood, ones that will hold all of your tool cases. Watch how i made shelves on the other wall of my garage in this video. Below are different shelving types that are suitable for use in the garage. In this example we made two shelf units in an l shape. You have to measure it well, where you will install the shelves.
Assemble the back of the garage shelves lay two of the leg pieces down flat on the ground or on the workbench, parallel to each other. I'm always looking for great storage ideas and solutions, especially in the garage where things tend to pile up. Use 3 1⁄4 in (8.3 cm) screws in the middle of the board every 18 inches (46 cm) to secure the shelf to wall. Garage storage and shelving solutions are abundant, but the prices can be shocking. Watch how i made shelves on the other wall of my garage in this video.
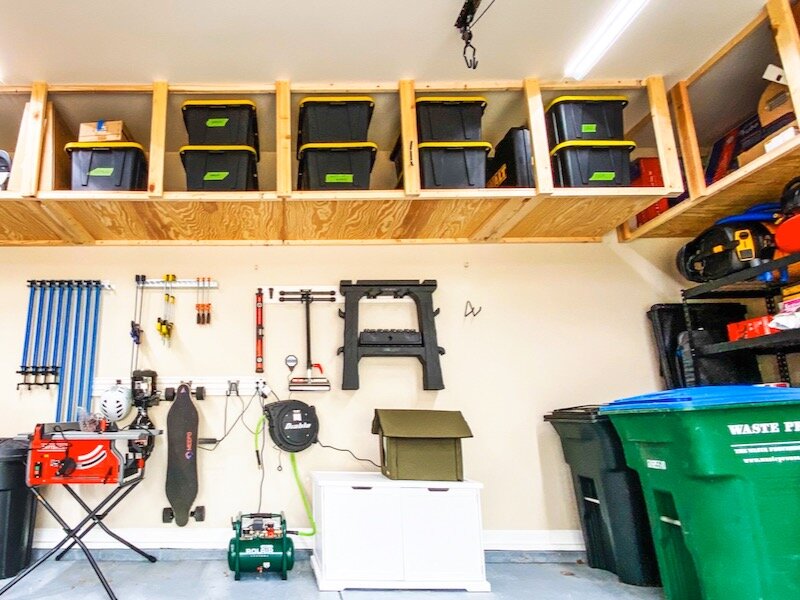
How To Build Diy Garage Storage Shelves Crafted Workshop from images.squarespace-cdn.com You can build your own garage shelves from scrap 2 x 4s and plywood, ones that will hold all of your tool cases. Shim the legs if your floor is sloped or uneven. In other words, i made all of my cuts to the 2x4s first. Hold the shelf frame so the bottom is level with the ends of the boards hanging from the ceiling. Repeat this process for each shelf. After that, you can start cutting the plywood. Start your tape measure on one of the wall studs and extend it to the length you want your shelf to be so it ends on another wall stud. This diy rolling garage shelf unit is the custom garage shelving solution you've been looking for at a fraction of the cost of your retail options.
Clamp the shelf to the pillar and tack a few screws along the back of the shelf to safely secure it to the wall.
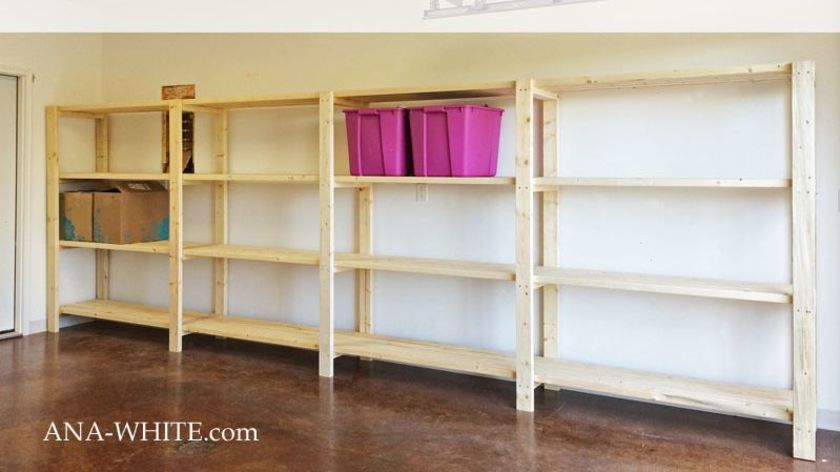
Once i had all of the parts ready to go, the actual assembly moved along pretty fast. Both shelf units were 8 feet long and 18 inches deep. Make sure the tape measure stays straight and level or else your measurement won't be accurate. Each shelf can the be place in position on the wall and supported on the loose end with a 2x4 acting as a pillar. You have to measure it well, where you will install the shelves. When i got ready to build my garage shelves, i decided to do it in an assembly line method. Watch how i made shelves on the other wall of my garage in this video. This diy rolling garage shelf unit is the custom garage shelving solution you've been looking for at a fraction of the cost of your retail options. Garage storage and shelving solutions are abundant, but the prices can be shocking. Attach 2x4s to the wall where the shelves will be placed with 3 screws into studs in the wall, two screws per stud in the wall. Start by cleaning the garage then sketch the shelving design. We used four screws for each side. Use 3 1⁄4 in (8.3 cm) screws in the middle of the board every 18 inches (46 cm) to secure the shelf to wall.
Check that the first rung is square to the legs. Here are some simple shelves that can be customized to fit your needs. You could make them 3 shelve. We used four screws for each side. Below are different shelving types that are suitable for use in the garage.
Diy Garage Shelves from res.cloudinary.com The easiest way to install the shelves is to raise them vertically along the back wall and then pull the bottom edge away from the wall once it will clear the floating 2x2 shelf support. Hold the shelf frame so the bottom is level with the ends of the boards hanging from the ceiling. Then, i drilled all of the pocket hole screws, then i cut all of the plywood panels. Once i had all of the parts ready to go, the actual assembly moved along pretty fast. Shim the legs if your floor is sloped or uneven. How to build basic garage storage shelving posted by eli larreau. In other words, i made all of my cuts to the 2x4s first. Keeping a garage organized is easier than it seems.
It just takes a little discipline and, most importantly, the right shelves.
Mark a line 5/8 down from the top of each leg (to fit the osb shelf), then position the first 48 piece like a rung of a ladder underneath that line. Once i had all of the parts ready to go, the actual assembly moved along pretty fast. Measure the distance between wall studs where you want to place your shelf. Start by cleaning the garage then sketch the shelving design. Perfect diy shelves for garage. This shelf unit is really sturdy. 20 diy garage shelving ideas. You have to measure it well, where you will install the shelves. Simply cut and prepare the wood, install the ledger, install the shear plates, and put up the shelves. To make this diy project, you will need deck screws, a handsaw, some plywood, a power drill, angle brackets, and an oriented strand board. Hold the shelf frame so the bottom is level with the ends of the boards hanging from the ceiling. After that, you can start cutting the plywood. It was a fun project to tackle!
Use a level to mark the entire stud, vertically, on the surface of the drywall with a pencil. Use 3 1⁄4 in (8.3 cm) screws in the middle of the board every 18 inches (46 cm) to secure the shelf to wall. Today i show you how to build your own garage shelving unit built out of 2x4s and plywood (or osb). Simply cut and prepare the wood, install the ledger, install the shear plates, and put up the shelves. Build the diy garage shelves to collect the stuff and the tools in one place in your garage.
Easy Ways To Build Wall Mounted Garage Shelves With Pictures from www.wikihow.com Start by cleaning the garage then sketch the shelving design. Each shelf can the be place in position on the wall and supported on the loose end with a 2x4 acting as a pillar. Assemble the back of the garage shelves lay two of the leg pieces down flat on the ground or on the workbench, parallel to each other. It just takes a little discipline and, most importantly, the right shelves. Locate studs in the wall and mark. If you want to maximize the space in your garage, you can make the floating shelves over the dresser and the other shelving unit. Build the diy garage shelves to collect the stuff and the tools in one place in your garage. Here is a system for building basic garage shelving that is simple, inexpensive, and sturdy.
It just takes a little discipline and, most importantly, the right shelves.
Here are some simple shelves that can be customized to fit your needs. The easiest way to install the shelves is to raise them vertically along the back wall and then pull the bottom edge away from the wall once it will clear the floating 2x2 shelf support. Here is a system for building basic garage shelving that is simple, inexpensive, and sturdy. Start your tape measure on one of the wall studs and extend it to the length you want your shelf to be so it ends on another wall stud. 20 diy garage shelving ideas. You can build your own garage shelves from scrap 2 x 4s and plywood, ones that will hold all of your tool cases. Both shelf units were 8 feet long and 18 inches deep. Use 3 1⁄4 in (8.3 cm) screws in the middle of the board every 18 inches (46 cm) to secure the shelf to wall. The design is simple yet sturdy and the pegboard supports mean the shelves can easily be adjusted. If you want to maximize the space in your garage, you can make the floating shelves over the dresser and the other shelving unit. Today i show you how to build your own garage shelving unit built out of 2x4s and plywood (or osb). Shim the legs if your floor is sloped or uneven. To make this diy project, you will need deck screws, a handsaw, some plywood, a power drill, angle brackets, and an oriented strand board.
